How to add captions to videos (including different languages)

Last week, I wrote about my current workflow for making screencasts, but I left out one important part: How to add captions or subtitles[1]. I'm embarrassed to say that in the past, with all the video I created, I just didn't bother with captions because, well, I was lazy --- I thought it would be too much work, and I could just let YouTube take care of it. But recently I've been making screencasts that are intended not only for English-speakers but also Spanish- and Portuguese-speaking audiences, and I wanted to make sure those videos were accessible to everyone --- to those with hearing difficulties and to non-native English speakers. So I had to get over my laziness and figure it out.
I'm happy to report that it turns out that using the tools and the workflow I wrote about earlier, it's actually not that hard to add captions, even in different languages. As usual, I wanted to share my process here. It's not exactly effortless, but it's worth it to create fully accessible video content, which is not only a good idea but also a requirement in many public education settings. I'll break this into three parts, because not everyone might want to use my entire workflow. Although the process looks complicated, once I figured it out and practiced with it, it now only adds about 15 minutes onto the process of making a video; and that doesn't change much for longer videos since much of this process is just manipulating a text file.
First, some assumptions:
- I'm using Camtasia for Windows. I believe things work similarly on Camtasia for Mac. One of the reasons I use Camtasia is precisely because of its range of features, including what you'll see below. Camtasia is not cheap, but it's definitely worth it if you are serious about making screencasts. But if you do something similar with a different tool, leave a note in the comments.
- At the point where this process begins, I've written the script for my video, created the audio track that I'll eventually use as a voiceover when I record the video, and exported the audio file (typically a WAV) to some place on my computer.
Creating captions
Camtasia offers a range of options for creating captions on videos, including an auto-capturing feature that attempts to auto-transcribe text from an imported audio file. But in my experience, the auto-transcription is pretty inaccurate, and I end up spending a lot of time correcting the text, and you still have to manually place the captions in the right place. Much less time consuming is Camtasia's sync captions feature. Here's how it works:
- Open Camtasia, import the audio file, and place it on the timeline. Put the playhead at the beginning of the audio.
- In the left sidebar, click on Captions. You might have to click More (at the bottom of the sidebar) first.
- Then click +Add Caption. This places a caption element on the timeline where the playhead is located.
- Copy and paste the text of your script --- all of it --- into the text box for the caption. This puts the entire script into a single caption.
- In the menu bar, click Modify > Captions > Sync Captions.
- The audio will begin to play back, and the text in the caption will be highlighted as the audio plays. When you reach a point where you want to break up the caption, just click on the text and Camtasia will break the caption and start where you clicked.
- Follow along through the rest of the audio, clicking on the text where you want the captions to go.
Here's what the process looks like, using a one-minute clip from a recent screencast. (Audio begins at 0:23.)
After the captions are done, proceed with the rest of the workflow I wrote about last time --- queue up the items you want to record, then record them as you play back the audio. The resulting video has the captions embedded within it. Then export the video, and you're done. The entire process takes not much more time than it takes to simply play back the audio.
Improving the basics
You could stop there if you wanted. But there are a few things I don't like about the captions this produces:
- They take up a lot of space on the video. Camtasia uses a pretty large font (42 point Arial) for captions, and apparently anything smaller is not compliant with the Americans with Disabilities Act (ADA) for those with visual difficulties. That's fine, except you also can't change the geometry of the box that the captions appear in. It's a box that takes up the middle half of the screen, which forces the captions to go quite high unless you make the captions really short in length. The first time I tried this process out, the captions took up the entire bottom third of the screen, obscuring much of what was on my slides.
- If you want subtitles in different languages, you have to repeat the process for each language. The captions are in whatever language your script is, and there's no way to select a different language without creating a whole separate video.
- They are "open" captions as opposed to closed captions. This means that the captions are hard-coded into the video itself and the viewer can't turn them off. So if you don't need the English subtitles, you're stuck with the captions anyway.
Fortunately there's a workaround that, again, isn't effortless but fairly straightforward, that uses a hidden Camtasia feature along the features of the hosting service for your videos. But first, we need to learn about file formats specifically for use with video captions. I was unaware these existed before hammering out this process. It turns out there are several specialized file formats for video captions, all of which encode not only the text in the caption but also the time stamps for the start and stop points for each caption. For this process, we'll use the default format that Camtasia uses, which is SubRip. SubRip is actually a piece of software that rips the subtitles from a video, but it also refers to the file format that the software generates; SubRip files end in *.srt and are commonly supported across many video platforms, including YouTube and Vimeo. It's basically a text file, with some specific formatting conventions, and it can be opened in a text editor and manipulated easily.
Camtasia will create and export an SRT file for the captions that we created in the basic process above which we can then use wherever we want. In Camtasia, click on the caption object in the timeline that was created above and click on the gear icon next to the word "Captions". Then click on Export Captions. A file explorer comes up asking you for a place to save the captions file, and the format defaults to *.srt. Give the file a name (and accept the default *.srt extension) and save it where you want it.
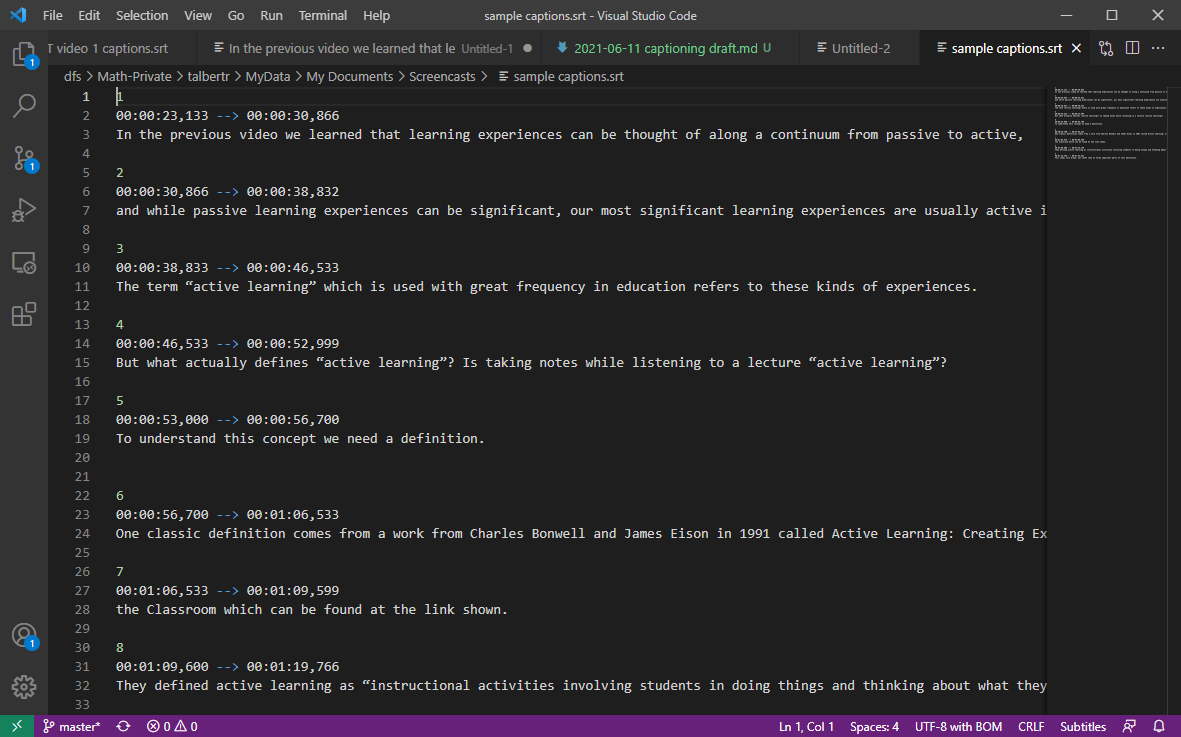
Now you have a SubRip file for your captions. Here's what it looks like for the practice video from earlier:
What happens now is that we process the video without the captions we created in Camtasia, upload the video, and then add the captions afterwards. In Vimeo, here are the steps (I think YouTube is pretty similar):
- In Camtasia, find the track on the timeline that has the captions in it, and click the eyeball icon on the left side of the screen. This will keep the captions in your project, but hide them from the exported video.
- Render and export the video (again, without the captions).
- Log in to Vimeo, go to your account home page, and select the video you uploaded. Then select "Advanced" in the right sidebar.
- In the screen that comes up, click on "Distribution" in the left sidebar, then scroll almost to the bottom where it says "Captions and Subtitles".
- Click on the "+" button to upload a file; select the language and the type. The Type is "Captions" if all you have is a transcription of the text.
- In the File Explorer, find the
*.srtfile you created and upload it. - Once uploaded, click the slider button next to the file name to activate the captions. Then click "Save".
Now, when the video is played back, users can turn the captions on or off by selecting the "CC" icon on the video.
Here's what the process looks like, again using the practice video from earlier. (This one has no audio.)
Translating captions
As before, you could stop here if you wanted --- particularly if all you need is an English transcription. But if you need a translation into another language, there's more to do. Fortunately, you do not need to do this yourself or hire someone. You can't just run the captions file through Google Translate, because it won't know how to handle the time stamps in the SubRip file we created. Instead, since our captions are in basically a plain text file, there are simple tools online that will do this for us.
I've been using https://translatesubtitles.co/ which is free and about as simple as it gets:
- Upload the SRT file to the website.
- Select the language you want in the dropdown menu in the top right.
- Click "Translate". You'll then see the original language as well as the target language along with the time stamps. Careful: This tool uses a web script to apply Google Translate to the original text of your SRT file while keeping all the time stamps in place. Google Translate isn't always 100% accurate so beware of potential translation issues. For the videos I was making with this process, I had one of my hosts in the country where it was being viewed look over the translation and alert me to any issues. Had there been any, I would have just manually edited the translated SRT file and re-uploaded.
- Click "Download". Careful: The translated file defaults to the same name as the original, so be sure to rename it or save it in a different folder, or else it will overwrite your original captions.
You now have a new SRT file for the translation. Now go back and repeat the previous steps for adding captions, selecting the appropriate language from the menu and uploading this file. Once you click "Save", the new language will appear in the list that shows up when you click "CC" in the finished video.
You can repeat this step for all the languages you want to use, and they will all appear as options in the "CC" menu. Here's the finished product of one of my videos I mentioned, with subtitles in English, Spanish, and Portuguese:
What is flipped learning? from Robert Talbert on Vimeo.
Conclusion
Like I said earlier, this is a lot of moving parts and it looks complicated. But after practicing with it, the entire process of taking a 5-minute video and adding captions in those three languages on Vimeo takes, at most, only about 15 extra minutes (and often less than this). It's totally worth it to have video content that has been created with care, especially taking seriously the needs of those with hearing difficulties or in different countries.
But, it's still possible that this could be simpler! If you have ideas or improvements, please share those in the comments.
The difference between a caption and a subtitle is that a caption is a transcription of dialogue, while a subtitle is a translation of the dialogue. For example a caption for a video recorded in English would show the English words on the screen along with descriptions of other non-verbal actions like laughing or music playing; a subtitle would show the words only, perhaps in a different language. To keep things simple, though, I'll use both terms synonymously here. ↩︎